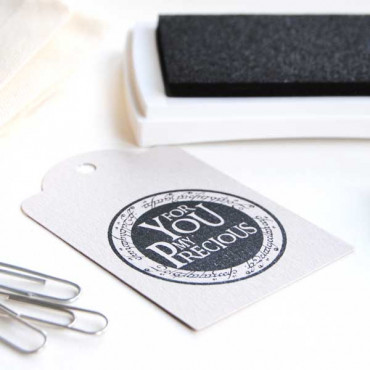
Logo stamp for personalized paper cups
Personalización
If you're looking for an easy and cost-effective way to personalize your paper coffee or tea cups, here's a great option: a custom logo stamp!
Of course, with this stamp, you’re not limited to just marking your cups. You can customize anything you like: napkins, tablecloths, boxes, bags, envelopes, DIY business cards, stickers—one stamp to handle all your packaging needs. If you decide to change your packaging in the future, you won't need to reprint hundreds of boxes; your stamp will keep everything ready to go.
WHAT SIZE SHOULD I CHOOSE?
The size of the stamp depends on the proportions of your logo and the cup you want to stamp.
The best approach is to take the cup, box, bag, or label you want to stamp and print your logo at the size you want to use. Once you find the perfect size, measure the printed logo and select the closest size from the dropdown menu, making sure it fits.
EXAMPLE: If your cup is a coffee cup that’s about 5,5 cm tall (2.2 inches) , the stamp size that will likely fit best is around 4 to 4.5 cm tall (1.6 to 1.75 inches), depending on your design. Print your logo at about 4 cm tall (1.6 inches) and measure the width. If the result is 4x3 cm (1.6x1.2 inches), you should choose the "4x4 cm / 1.6x1.6 inches" option from the dropdown because the "4x2.5 cm / 1.6x1 in" size won’t fit.
HOW TO STAMP PAPER CUPS?
As you can see, the surface of the cup isn't flat, so all you need to do is place the stamp on the cup and rotate it along the curve of the cup. It’s very simple and easy. We recommend stacking several cups (one inside the other) to create a firmer stamping surface than a single cup alone. This way, you don’t need to hold the cup from the inside.
CONTENT
- 1 custom stamp featuring your logo or image
* Ink is not included. If you need ink, visit our Ink for Stamps section.
DETAILS
- Stamp Size: Select from the dropdown menu
(the exact size will depend on the proportions of your logo or design and the size you choose).
- Material: Natural pine wood, rubber.
HOW TO STAMP PAPER CUPS
As you can see, the surface of the cup is not flat, so all you need to do is place the stamp on the cup and rotate it along the curve of the cup. It’s very simple and easy. We place several cups (one inside the other) to make the stamping surface more rigid than a single cup. This way, you don’t have to place your hand inside the cup.
Remember, you can create a stamp with not only your logo but also any image or illustration you want. Just make sure your design meets the specifications listed in the PRODUCTION section.
Specific References
PRODUCTION TIME
Production time is 3–5 business days after your design confirmation + shipping.
* IMPORTANT * We’ll send a preview of your personalized design to the email you used for your order—please check your inbox and your spam folder. If we don’t hear back within a few days, we’ll proceed with production as per the preview, unless we have any doubts or are missing a file. You’ll find more shipping details in our Shipping & Returns section.
We produce and ship orders once a week to reduce our environmental impact: delivery drivers only need to come once a week, we can batch orders together, and it helps us stay organized—Biterswit is just the two of us (Carlota and Norma), and we can’t keep up with daily production and shipping. Thanks so much for understanding!
We believe sustainability goes beyond recyclable packaging—our work process aims to be mindful too. So no, your order won’t arrive the next day, but it will arrive lovingly packed by hand, with care and attention to reduce our environmental footprint as much as possible. So all we can say is: thank you for your patience, and for supporting our small studio!
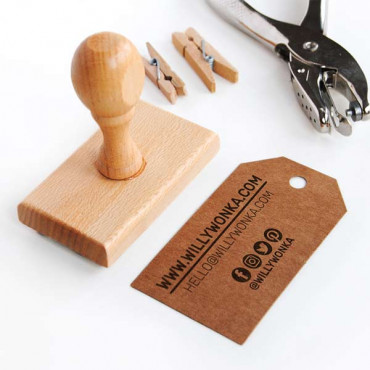
All our stamps are handmade in Barcelona. We cut and mount each one on natural wood from local suppliers.
HOW TO ORDER YOUR CUSTOM STAMP
1. Fill in the Personalization section with the required info. If you need to upload an image, check the format details below.
2. Click the SAVE PERSONALIZATION button so we receive your details. If you don’t click this button, the info won’t be saved and you won’t be able to add the product to your cart.
3. Select your preferred options from the drop-down menus (if needed).
4. Add the product to your cart and complete your purchase.
Once we have all the material we need for your custom order, we’ll send you a digital preview of the design within 24–48 business hours to the email associated with your account. The preview will include the actual size of the stamp design, as this depends on each layout and name.
If you don’t see the email, check your spam folder. If nothing’s there, just write to us at hola@biterswit.com with your order number.
FILE FORMAT FOR IMAGE UPLOAD
If you’re uploading an image, it must be a .JPG file at 300dpi, black and white only (not grayscale), and with a minimum font size of 8pt. We need the largest, highest-quality version you have :) If the file you upload doesn’t meet the quality requirements, we’ll email you as soon as we review your order.
If you have the original Illustrator or a .PDF file, please upload a .JPG during your order and then email the original file to hola@biterswit.com with your order number.
The Illustrator or PDF file must have outlined fonts—meaning all text must be converted to shapes, not editable text. If you're unsure about anything, just send us an email!
I DON’T HAVE MY LOGO OR IMAGE IN BLACK AND WHITE
No worries! If your logo has watercolor textures, shades of gray, or multiple colors, just send us the highest-quality version you have to hola@biterswit.com and we’ll let you know what we can do. There’s always a solution :)
DIGITAL FILE
If you’re purchasing a stamp with a Biterswit design, you can also add the matching digital file to use in your invitations, stationery, signage, guestbooks, websites, videos...
The digital file will be sent as a black-and-white PDF.
In our Stamp Inks section, you’ll find a wide variety of ink colors for different surfaces (we specify the surface type in each product name). Each product includes detailed information and tips to help you get the most out of your ink. We hope this helps!
BITERSWIT GUIDE: STAMP USAGE & CARE
Here’s our Biterswit guide to help you take care of your stamps and inks. Enjoy! ?
HOW TO STAMP? Little tricks :)
1. Start with a little ink. No need to press too hard on the ink pad.
* Sometimes we tend to use too much ink, so it’s best to start with a little bit. Just tap the pad lightly until you get the right amount.
* The amount of ink you need can depend on the surface you're stamping: the more porous and rough the surface, the more ink you'll need.
2. Stamp on a flat surface. Don’t worry if the first impression isn’t perfect — it’s totally normal! New stamps need a little practice. Just have fun and keep testing until you get that perfect print!
WANT TO STAMP ON FABRIC?
If you’re stamping on fabric, go for natural fibers like cotton, linen, and silk. It works great! Just keep in mind that the ink isn’t 100% permanent, so with washing, it’ll fade a bit over time. To make it last longer, just iron the fabric after stamping to really set the ink.
If you want something more durable, we recommend Speedball inks.
STAMP CARE
* Clean your stamps when needed. If you’re using them often and the impressions start getting too ink-heavy, it’s time for a clean! Just don’t scrub too hard or use harsh chemicals.
* Oil-based ink. Inks like Encore are oil-based, and we recommend not overusing them on your stamps because it can damage the material. After using them, clean your stamp by stamping it on paper until it stops leaving marks, and use a cloth or wipe to get rid of any leftover ink. Remember! Never use water to clean stamps with oil-based ink. It reacts with the ink and makes everything sticky (trust us, we know from experience!).
* In addition to the Biterswit guide, we also have a short video where we explain how to store and clean your Biterswit stamps.
Logo stamp for personalized paper cups
TAMBIÉN TE GUSTARÁ

VersaCraft Real Black ink pad (paper, fabric and wood)
€8.00
€8.00
With this VersaCraft Real Black ink pad you can print on uncoated paper, wood, and clothing. It is an ideal black ink to create your prints on tote bags, tablecloths, t-shirts... The Versacraft Real Black Ink Pad is a high-quality, water-based ink pad designed for a wide range of crafting and stamping projects. The rich, true black ink produces crisp,...
Brown kraft labels (25 units)
€4.00
€4.00
Pack of 25 brown kraft cardboard labels to make your DIY business cards, labels for your handmade products, hang on your wedding gifts or to decorate Christmas and birthday gifts. These brown kraft labels are the perfect way to complete any project! With 25 units in each pack, you'll have plenty of labels to create a professional, cohesive look. The brown...
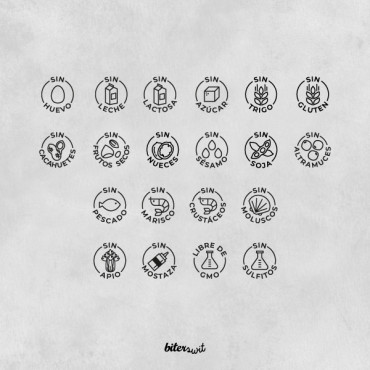
Mini stamps Food intolerances and allergies (Spanish)
€6.00
€6.00
Make your events and gatherings inclusive and stress-free with our Mini Stamps for Food Intolerances and Allergies, designed in Spanish! These minimalist stamps feature simple food icons to clearly label buffet or catering tables. Whether you're hosting a wedding, party, or corporate event, these handy tools ensure everyone knows what's safe for them to...
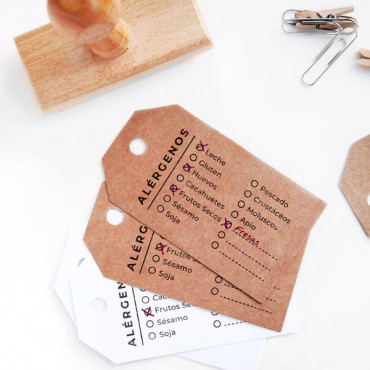
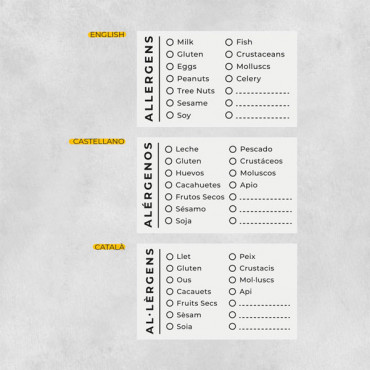
Most common food allergens label stamp (Multiple Languages)
€17.00
€17.00
Make food labeling easy with this handy Most Common Food Allergens Label Stamp! Perfect for restaurants, take-out, buffets, and even personal meal prep, this stamp allows you to clearly mark the most common food allergens right on your packaging or menu. You can choose the language to suit your needs. Simply use a pen to mark the allergens included in...
Custom stamp logo Coffee Shop "Italian Coffee"
€20.00
€20.00
Looking for a way to add a personal touch to your coffee shop branding? This custom stamp is the perfect choice! Featuring a sleek, round design with a minimalist Italian coffee funnel filter icon, it’s pre-designed by us for you to personalize with the name of your bar or coffee shop around the image. Whether you’re stamping coffee cups, bags, or...
Premade logo stamp Vintage Coffee shop
€24.00
€24.00
Give your coffee shop a personalized touch with our premade custom stamp logo, available in two charming designs. Whether you prefer the sleek simplicity of a black silhouette coffee cup or the warmth of a coffee cup with a heart inside, each option radiates vintage charm. Framed in a clean black border and surrounded by sunny rays, this stamp design is...
Premade logo stamp paper cups "Coffee Beans"
€20.00
€20.00
Looking for a creative way to make your coffee brand stand out? This premade logo stamp is just the thing! Featuring a charming round design with two coffee beans and subtle smoke lines, this stamp adds a cozy, artisanal vibe to your paper cups, coffee bags, and more. The best part? You can personalize the text around the beans to include your shop name,...
Vintage Tea House Premade Logo Stamp
€24.00
€24.00
Looking to add a touch of vintage charm to your tea shop packaging? The Vintage Tea House Premade Logo Stamp is here to give your paper tea cups, bags, and boxes an elegant, timeless vibe! Featuring a classic teapot at its heart surrounded by sunny rays, this design evokes warmth and nostalgia. The text around the logo is fully customizable, making it...