


Stamp with the silhouette of a monstera leaf to create borders and patterns on the clay pieces in your pottery class. You can create a beautiful pattern on a pot with the stamp size of your choice and paint it.
To color it, just mark the stamp on the flowerpot, bisque-fire the piece and then use engobe in the hollows left by the stamp. Remember to remove the excess with a damp sponge as you can see in our video.
Did you know that the Monstera plant is often called the "Swiss cheese plant" because of its unique, hole-punched leaves? These natural holes help the plant withstand strong winds and heavy rain in its native tropical habitat. Plus, they make it one of the most trendy plants for interior decor!
You can choose the size you want in the dropdown menu. The one shown in the pictures is the smallest size (0.9 cm / 0.35 inches approx.). Our stamps for ceramics are mounted on a wooden bases with a handle to make them comfortable to use :)
Ceramic stamps are harder than normal paper stamps. This stamp is not suitable for use with ink but you can use it on ceramics, polymer clay, soaps, similar materials… Along with your order, you will receive the instructions.
CONTENT
- 1 Monstera Leaf texture stamp for clay and soap
- Choose the sign at the personalization box
This stamp is not suitable for paper stamping with ink.
DETAILS
- Wooden base stamp
- Stamp size: To choose from the dropdown menu.
- Special hardness and depth
WHERE CAN I USE IT?
- In soaps
- In ceramics and clay
- In polymer clay
- Similar materials...
This stamp is made for marking your ceramic pieces, polymer clay, and cold process soaps.
It’s got just the right hardness and depth to press into your clay without losing detail. Just a heads-up: these stamps aren’t made for use with ink.
BITERSWIT GUIDE: USING & CARING FOR YOUR STAMPS
Here’s our Biterswit guide with tips on how to take care of your stamps and how to use them like a pro.
HOW TO STAMP ON CLAY – Little Tips & Tricks :)
- Super easy! Your clay is ready to stamp when it’s still soft and shapeable—not too dry. It should be soft or at a leather-hard stage so the stamp can sink in nicely. You’ll figure out the sweet spot with a bit of trial and error depending on your clay type, moisture, and room conditions.
- Avoid stamping on material that’s too hard—it could break your stamp.
- Try out different levels of pressure until you find what works best with your clay. Since the stamp is transparent, you can peek from the side to see how deep it’s going.
- Bigger stamps need more pressure, so it can help to support your piece from underneath with something like a metal base, your hand, fingers—whatever works to keep it steady. Big stamps are great for flat objects like plates, trays, coasters, or thicker-edged pieces. For delicate pieces, we recommend using smaller stamps since they need less pressure.
- If the stamp sticks to the clay, a light dusting of cornstarch on the surface can work wonders to keep it from sticking.
HOW TO STAMP – TIPS & TRICKS
- Your soap is ready to stamp when it’s firm enough to cut—usually around 24 hours after making it. This depends on humidity and temperature, so check when you can unmold it.
- Once unmolded, cut it into bars.
- Spray the soap with 96º alcohol before stamping. It prevents the stamp from sticking. We’ve tried spraying the stamp too, but spraying the soap gives better results (and it’s easier!).
- Try different pressure levels to find what works best for your soap’s consistency. If it’s too dry, you may need to press a bit harder. Since the stamp is transparent, you can look from the side to check how deep it’s going.
OTHER WAYS TO USE YOUR STAMP
Your stamp isn’t just for ceramics! You can also use it on:
- Cold process Soaps (When they are soft)
- Polymer clay
- White air-dry clay
- Cookie dough
- And other similar materials
HOW TO CLEAN YOUR STAMP
If your stamp’s getting a bit clogged with clay and your impressions aren’t as sharp as they used to be, it’s cleaning time! :)
Here’s a short video that shows you how (we hope it helps!).
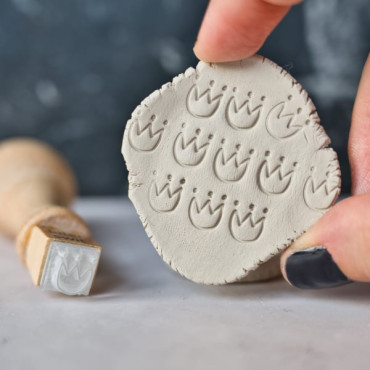
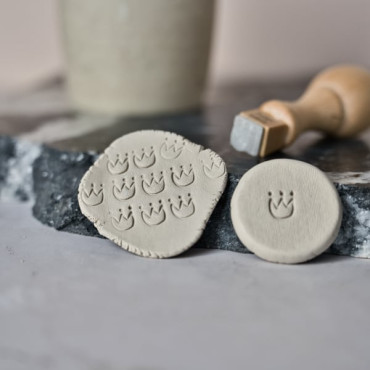
With this custom logo stamp for pottery and clay, you can personalize all your ceramic pieces with your brand image, name, or icon. With just a simple and easy action, your pieces will be marked and customized, ready to bake :) It's perfect for stamping soft and hard leather clay. You can choose the size that best fits your creations. Just remember, the...
Looking for a personal touch for your clay creations? This custom clay stamp with your name or text is perfect for adding a unique mark to your pottery, soaps, or polymer clay projects! Choose from 4 stylish font options that you can check out in the product photos. Whether you're a ceramic beginner or just don't have a logo, this stamp is a great way to...
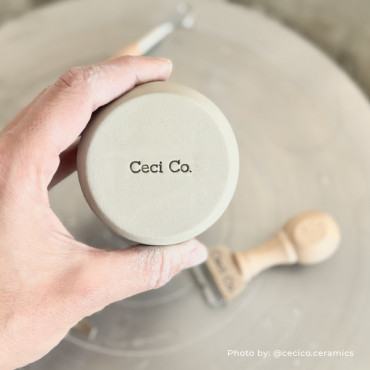
Custom pottery stamp with your name around a minimalist illustration of a monstera leaf for handmade ceramics signature. A stamp that you can use both on ceramics and soap, you just have to put the text you want. This is one of our premade logo stamp but you can find more designs on our website biterwit.com :) Ceramic stamps are harder than normal paper...

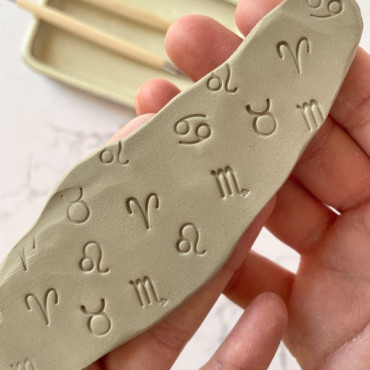
Mini texture stamp to decorate your ceramic pieces with the zodiac sign of your choice :) It is perfect to create a zodiac pattern on your cups, and plates or even to create special jewelry for each horoscope sign. The size of the stamp in the photos is 0,9 cm but you can select the size you want at the drop-down menu. In this product, you will find them...
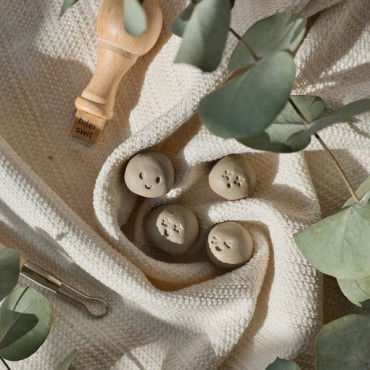
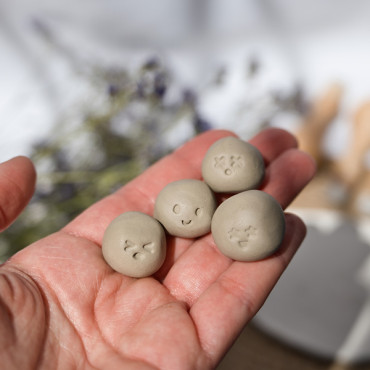
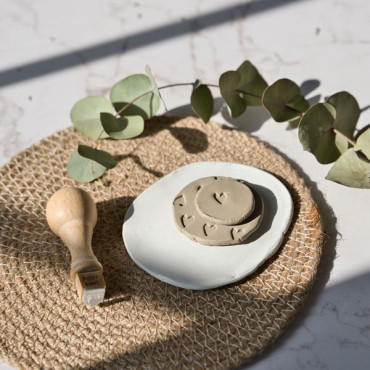
Turn your handmade ceramics and soaps into adorable works of art with these small face texture stamps! Perfect for adding personality to cups, plates, vases, and clay figures, these little expressions bring a fun and playful touch to your creations. With different face designs like smiley, marveled, in love, Kiss, and even a dramatic K.O., you can mix and...
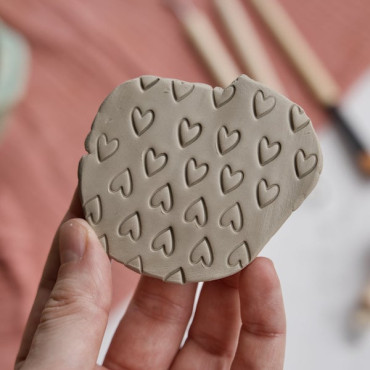
Acrylic stamp with the silhouette of a heart so you can create patterns and decorate the pieces of your ceramic classes. You can stamp it on the sides of a breakfast bowl, or on the bottom of a mug to appear when you finish drinking your favorite coffee or tea. You can also decorate your wedding favor soaps or decorate polymer clay earrings. You can...
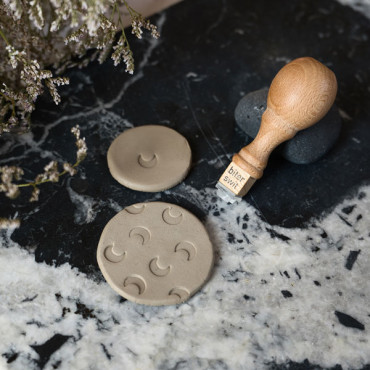
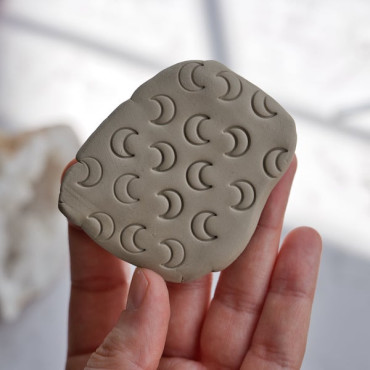
A moon silhouette clay stamp for pottery decoration, you can use it as a waxing crescent moon or a waning crescent moon. A versatile acrylic stamp perfect for decorating your pottery class creations. You can create a pattern on a plate for your jewelry, on a mug, breakfast bowl, or flower pot. It is also perfect for jewelry made of polymer clay. You can...
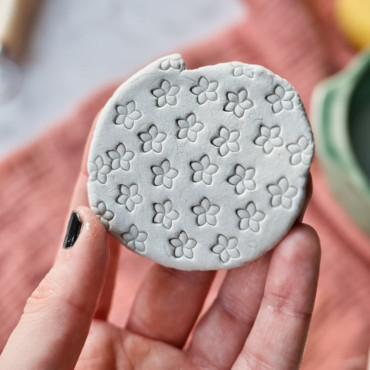
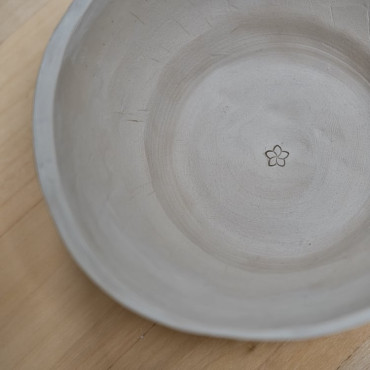
Special minimal clay texture stamp to decorate ceramic pieces with an Inca-style flower with dots on the leaves, a minimalist and simple design that will look perfect making a border on the edges of your plates, cups, and pots, or as a pattern on plates or trays. It is also perfect for marking and differentiating soaps, so you can use it for your handmade...
We cannot deny that we love floral prints for ceramics, as our collection of stamps for decorating ceramics with flowers is steadily growing. This Plumeria or Franjipani flower stamp was created because a customer from Hawaii requested it, and we just couldn't say no :) (It seems like a made-up story that fits perfectly, but no, it's real, and we're super...